
Sunday, September 29, 2013
Wooden Signs
I have been busy creating some wooden signs in preparation for the holidays. Here is one of them below. They are painted by hand and made from solid wood. I do custom orders. If you want to see some other examples of my work, you can go to my blog featuring my work called: Wooden Designs. There is also a link at the top, left of this blog. I love this one because it is reversible. You get two decorations in one.

Tuesday, September 24, 2013
Chocolate Oatmeal Cookies
Have you ever made cookies with a box of cake mix? I have made them many times and in many different ways. I like them because they are quick and easy. I also like them because you don't have to use butter to get a yummy cookie. Don't get me wrong, I love my chocolate chip cookies made with butter. However, they can be temper-mental since the butter has to be at just the right temperature to get a good dough. So, when I have to bring cookies somewhere and want to do an easy cookie, I do cake mix cookies. However, I don't like all the ingredients in cake mix, and I don't care for the refined flours in them either.
So, this is my recipe for cake mix cookies from SCRATCH without the box of cake mix. Specifically, "Chocolate Oatmeal Cookies." Maybe kind of silly to make an easy cookie a little more complicated. But, I like it because it makes them a little bit healthier. In this recipe, the only "unhealthy" ingredient is the sugar. Everything else is pretty good for you and a little sugar every once in a while isn't so bad. And if you want, you could always use a boxed chocolate cake mix instead of making the cake mix yourself.
.JPG)
Here are just a few of the ingredients I used. The applesauce is UNSWEETENED and the oil is COCONUT oil.


Once everything is in the bowl, mix it really well. I usually have to get my hands in there and mix it by hand. It may seem like it needs more liquid at first, but just keep mixing. Trust me! Once everything is well incorporated, the dough will look like this big clump in the picture above.


Don't they look so good! And with whole wheat flour and oats, they aren't too sinful either! The applesauce makes this a soft, chewy cookie. If you prefer a crunchy cookie, you can up the oil to 1/2 cup and use a 1/4 cup of water instead of the applesauce.
And here is the whole recipe:
Chocolate Oatmeal Cookies
2 C. soft whole wheat white flour (all purpose flour would also work)
1 C. cocoa powder
1 tsp baking powder
1 tsp baking soda
1/2 tsp salt
1 and 3/4 C. white sugar
1 C. oatmeal
1/4 C. coconut oil
1/2 C. unsweetened applesauce
1 flax egg
1 tsp vanilla
Chocolate chips or other mix in, if desired
Preheat oven to 350 degrees. Mix together the first 6 ingredients to make the dry cake mix or use a boxed chocolate cake mix. Add the other ingredients and mix well. Form balls of dough and place on parchment lined cookie sheet. Bake for 12 minutes. (Makes 3 dozen)
Saturday, September 21, 2013
Oatmeal Breakfast Bars
When it comes to
breakfast, I have stayed away from cereals for the last couple years. After
eating them almost every morning for breakfast for 20+ years, they have kind of
lost their appeal. I have gone through different phases when it comes to
breakfast since giving up the cereal. I have done eggs, yogurt, oatmeal, etc
for different periods of time. Currently, my usual breakfast is some toast with
peanut butter made from home made whole wheat bread. It is simple, quick
(provided that I already made the bread), and healthy.
But, one of my favorite
treats to make myself for breakfast is Oatmeal Breakfast Bars. They are quick
to throw together and only take 20 minutes to bake. Plus, they taste delicious
and can be vegan, fat free, and sugar free (with the exception of the chocolate
chips, which are totally optional). And they taste sooo good that I'll have
them for breakfast and as a late night treat.
My recipe is adapted
from this: Healthied Up Oatmeal Chocolate Chip Bars
Her recipe is pretty
healthy and she also has a second version of the recipe that isn't so healthy
for when you want something a little more indulgent.
I took her recipe one
step further and use applesauce as the main sweetener. Success? I think so. It
is still tasty and it makes it even healthier. This bar is hard to describe. It
is not fluffy. It is chewy, moist and dense. Not really muffin like or quick
bread like. I guess you'll just have to try it and see for yourself.
.JPG)
.JPG)
What
makes this recipe quick is it is a one bowl recipe. Just throw everything in
the bowl and mix it. The first ingredients are some regular rolled oats and
whole wheat flour. I grind my own wheat and use soft white wheat from Wheat Montana.
.JPG)
And here are the
rest of the ingredients in the bowl. The applesauce is sugar free. The
chocolate chips are not sugar free, but you could omit them or use sugar free
ones. The red stuff is some freeze dried strawberries. This makes them extra
yummy and even more healthy!
.JPG)
My freeze dried
strawberries are from Thrive Life. They have a ton of freeze dried
berries to choose from. I think you could easily use freeze dried raspberries
or blueberries instead of the strawberries, or even do a combination. Amber
Larson is my consultant and you can order from her here.
.JPG)
Once it is all in
the bowl, just give it a quick mix. My kids love the batter and since there are
no eggs, you could totally eat it as just batter.
.JPG)
Here it is all
ready for the oven. I like to line my pan with foil for easy clean up. This
recipe makes a small batch for an 8x8 pan. If you have a big family, you may
want to double the recipe.
.JPG)
And here it is
fresh out of the oven. This tastes good warm from the oven, cold, or even
reheated in the microwave.
.JPG)
Here is my
breakfast. I love topping this with a little peanut butter and a glass of water
to wash it down. It would probably be even better with a glass of milk, but as
part of my healthier diet I drink only water during the day and stay away from dairy.
.JPG)
So
here is my recipe:
Oatmeal Breakfast Bars
§
2 C. Whole Wheat Flour (you could also try all purpose or GF
flours)
§
1/2 C. Rolled Oats
§
1 C. unsweetened Apple Sauce
§
1 T. Ground Flax Seed
§
1/2 C. Almond Milk
§
3 t. Vanilla
§
1 t. baking powder
§
1/2 t. salt
§
1/2 -2/3 C. mix ins of choice (I did 1/4 C. choc. chips and 1/4
C. freeze dried berries)
Preheat
oven to 350 degrees. Mix all ingredients together in a bowl. Line an 8x8 pan
with tin foil and press batter into pan. Bake for 20 minutes.
Be sure
to let me know if you try it!
Monday, September 16, 2013
Home Remedy for Mosquito Bites
As many of you know, I am an independent distributor for Treasure Scents. In order to expand my customer base, I participate in an outdoor vendor market on Saturday nights at the Ak-Chin Multi-tainment Center. (It is the new state of the art movie theater with a bunch of other attractions just a short drive from home).
I have been at this market almost every Saturday night the last few weeks and most of the time, I don't even bother with bug repellent because the mosquitoes haven't been a problem. BUT, this past Saturday night, they were ALL over and they were HUNGRY! I had on an "all natural" mosquito repellent on and it did NOTHING. They were ruthless. There were multiple mosquitoes landing on me at any given time. Yikes!
Thankfully, someone took mercy on me and let me use their bug spray. Ya know, the kind with deet meant for deeply wooded areas. I sprayed myself like crazy and finally got some relief but the damage had been done. On my right arm alone I had 10 mosquito bites, not to mention what they did to my other extremities. They seemed to especially enjoy my calves and my feet.
SO, last night, I awoke around 1:00 am itching like mad. I was desperate for some quick relief, so I did a search on my phone and came across this: http://www.home-remedy.org/home-remedies-for-mosquito-bites.html
This webpage lists 14 different home remedies to relieve mosquito bites. Below, I have shared the top 4 on the list.
.JPG)
I have been at this market almost every Saturday night the last few weeks and most of the time, I don't even bother with bug repellent because the mosquitoes haven't been a problem. BUT, this past Saturday night, they were ALL over and they were HUNGRY! I had on an "all natural" mosquito repellent on and it did NOTHING. They were ruthless. There were multiple mosquitoes landing on me at any given time. Yikes!
Thankfully, someone took mercy on me and let me use their bug spray. Ya know, the kind with deet meant for deeply wooded areas. I sprayed myself like crazy and finally got some relief but the damage had been done. On my right arm alone I had 10 mosquito bites, not to mention what they did to my other extremities. They seemed to especially enjoy my calves and my feet.
SO, last night, I awoke around 1:00 am itching like mad. I was desperate for some quick relief, so I did a search on my phone and came across this: http://www.home-remedy.org/home-remedies-for-mosquito-bites.html
This webpage lists 14 different home remedies to relieve mosquito bites. Below, I have shared the top 4 on the list.
Home Remedies For Mosquito Bites
Salt
This seems to be the quickest of all home remedies for mosquito bites. Simply moisten the bite area and then rub table salt on the moistened area. Itching should cease immediately.
Apple Cider Vinegar
To relieve the itching, rub apple cider vinegar directly on the mosquito bites.
Toothpaste
Toothpaste is another one of the fastest home remedies for mosquito bites. Just dab a bit of toothpaste onto the mosquito bites and the itching should stop very quickly. Peppermint toothpaste is by far the best.
Calamine Lotion
Apply calamine lotion to relieve the itching caused by mosquito bites.
As I lay there in the middle of the night I went through my options, the first two were possibilities since I have plenty of salt and vinegar in my kitchen pantry. Calamine lotion was our "go to" for itches when I was young, but I have never bought any as an adult, so that option was a bust. Toothpaste seemed a bit out there, but I had plenty right in my bathroom just a few feet away. Proximity was a strong factor in choosing my solution. So, I got up and proceeded to rub dabs of toothpaste onto ALL of my bites. I haven't been able to bring myself to count them, but it is probably in the 30-40 range.
.JPG)
This is the toothpaste I used. Within a couple minutes I felt some relief and was able to fall back asleep. It looks like I need to buy some heavy duty bug spray before I spend more time outside, so that I can avoid late night toothpaste rub downs. What home remedies have you used to relieve itches or mosquito bites?
Thursday, September 12, 2013
The No-Poo Challenge
So, in my first ever blog post I talked about my dry shampoo recipe that came from this page: I don't use shampoo. The main focus of this gal's blog post isn't even dry shampoo, it is actually all about not using shampoo. Instead of shampoo she uses a mixture of baking soda and water. And, instead of conditioner, she uses a mixture of vinegar and water.
Be sure to check out her original blog post because she gives a ton of tips and important info, but her ingredients and basic instructions are listed here:
.JPG)
Be sure to check out her original blog post because she gives a ton of tips and important info, but her ingredients and basic instructions are listed here:
Baking Soda
Vinegar (White or Apple are fine)
Vinegar (White or Apple are fine)
Put one tablespoon of baking soda into a squeeze top bottle along with one cup of water. Shake until the baking soda is dissolved.
Combine 2 tablespoons of vinegar and a cup of water in a spray bottle. Shake.
What you do: Thoroughly rinse your hair with water. Add the baking soda mixture to your roots and massage thoroughly. You’ll notice a slightly slimy feel…kind of like shampoo. The baking soda breaks up any sort of residue buildup you may have from hairspray or other hair products. Thoroughly rinse the baking soda out of your hair.
Then spray in the vinegar mix through the length of your hair, paying special attention to your ends. Keep it in your hair throughout your shower until you’re about to get out.
Today I took this challenge and I would like to share my initial impression with you. I followed her ingredient list almost exactly. I used the baking soda and water mixture in a squeeze bottle (the one I got from the hospital after having my daughter that had, since my postpartum days, become a bath toy). And, I used the white vinegar mixture in a spray bottle I had left over from a dry shampoo experiment that was so impractical it is not worth discussing. I also added a couple drops of grapefruit fragrance oil to the vinegar mixture just to make sure my hair wouldn't smell like vinegar afterwards. You could probably use a couple drops of essential oils as well. (If you don't know where to buy fragrance oil or essential oil, you can purchase some here. There is also a link to my Treasure Scents page on the top right of this blog where you can order some).
Once I got out of the shower, I combed through my hair. Amanda (the one who wrote this recipe) said it takes a few minutes for her to de-tangle her hair without conditioner, but for me combing my hair wasn't any different. I'm not sure if this is because my hair is shorter (above my shoulders), finer (my hair is VERY fine) or because of the fragrance oil). Whatever it was, I am glad I did not have the de-tangling issue.
After I combed and toweled off my hair, I styled it like normal. I use a little leave in conditioner, some stuff that is supposed to protect my hair from heat damage and a root booster for volume. I blow dry my hair and then straighten it.
.JPG)
Once I was all done, I would say my hair looks and feels just like it does when I use regular shampoo and conditioner. It also doesn't smell weird. The most obvious smell is from my root booster, which is normal. I do think there is a little more volume/body (especially on the top of my head).
So far, I am SOLD. This kind of hair cleaner is WAY cheaper than real shampoo/conditioner, and I love keeping my money in my pocket. And, with this method, you don't have to wash your hair as frequently and it may even help your hair grow faster/healthier. I think I will keep at it for 30 days and let you know if I still think it is a winner!
Now, I need to work on getting rid of those blemishes! I have heard tea tree oil can help. Maybe I will make that my next 30 day challenge.
Thursday, September 5, 2013
"Go To" Arm Exercise video
So, as many of you may know, I went on a vegan diet a few months ago to help me lose weight. I am down 23 pounds from when I changed my eating habits, something I will probably blog about in more detail another time...
While dieting, I also tried to kick my exercise routine up a notch. I have always been pretty good about exercising regularly. My usual routine is to jog/walk on my treadmill for 20-30 minutes depending on how much time I have. But, that is just cardiovascular. When I started my diet, I also tried to do more strength training exercises. I didn't go crazy or anything. With two kids (3 and 14 months old) I lack the time and energy to go all out.
Shortly after beginning my diet, I found a great arm workout video on YouTube by Tracy Anderson, and it is my "go to" arm workout when I am exhausted, but want to get some arm toning in before I collapse on the couch. My husband calls it my "Eagle Workout" or "bird workout" because you do a lot of arm flapping and it may feel kind of ridiculous at first, but this workout is no joke. I love it!
What I love about this video:
1. It is less than 8 minutes.
2. No equipment.
3. It ia a quiet workout. Great for when I am waiting for the kids to fall asleep.
4. I sweat a little while doing it, but don't get drenched.
5. It tones your whole arms and burns while you do it!
I am not kidding about number 5, I got a couple compliments on my arms after just doing this video for a few weeks. At first, I did it 3 times a week and it was my only arm workout. Now I do it about once a week along with lifting weights to build my biceps and triceps. This is a great mini workout on its own or a great addition to your preexisting arm workout. But, don't take my word for it. Stand up and give it a try right now!
Wednesday, September 4, 2013
Book Review on "The Discovery of Witches"
Confession time!!! I have never written a formal book review before and I don't read very many of them either, so I have absolutely no idea how a typical book review should read in regards to format and what basics to cover. But, since reading is one of my favorite things, I am happy to share my opinion of the books I find "review worthy" with my captive audience!
I just finished reading The Discovery of Witches by Deborah Harkness. I read it on my 3M library app and today it told me that I had "less than a day left" on my check out. That was quite the motivation to finish the last few chapters, since I had no idea how much time "less than a day left" meant. Did I have 15 hours left? 2 hours left? Luckily, I finished and was able to check the book back in with time to spare.
Please keep in mind that my purpose for writing thisreview is to simply share my opinion of what I liked and did not like about the book. My purpose is not to offend anyone.Thanks!
The Discovery of Witches is the first book in a trilogy. It is a mythical story filled with witches, vampires, and daemons. These creatures live among humans and usually only associate with their own kind: witches with other witches, vampires with other vampires, etc. It is set in modern day time and they live among humans and do their best to not draw attention to themselves, somewhat like the way muggles and witches/wizards live in Harry Potter.
The story focuses on an intelligent, athletic witch that tries to pretend magic is not a part of her life, and a wealthy, smart vampire that has lived longer than imaginable. There is a romantic story line between the two of them and they find themselves being attacked by the witches and vampires that consider themselves "in charge."
There are many other story lines within the book besides the romance. The plot line is well thought out. There is a lot of mystery from the very beginning and the end of the book has left me wanting to find out what happens next. This is a fun read. It isn't too dark or scary or gruesome, although there is some violence and death.
There were a few things in the book that bothered me a little. First of all, the witch did have a bit too much of the weak, damsel in distress thing going on, despite being a smart, powerful witch. She also, in my mind, came across as being very unkempt with wild hair and a poor wardrobe, yet she still gets this incredibly attractive vampire to fall for her. Not really sure I buy into that. I don't want the main character to come across as a super model, but why not have her care just a little bit about her appearance? Especially since she is a professional, succesful woman, there is no reason for her to be frumpy. Also, she ate a ton in the book. She was constantly eating and having seconds or thirds... It was just a bit much. I don't care what the characters in the book are eating for lunch.
The sexual content in the book was no more telling than a Nicholas Sparks novel. There was just one "love" scene, but it was really long and drawn out. It was so long that it became awkward. It wasn't super graphic, but it gave enough detail to let the imagination fill in the blanks.
A couple other points, just FYI's for those that may care:
There were several gay/lesbian characters. There are no sexual scenes between these characters.
The language in the book is very clean. It took me 3 weeks to read it, so I can't speak with absolute certainty, but there was maybe 1 or 2 "bad" words, if that. Nothing sticks in my memory as offending me in the language department.
Overall, I would recommend the book to someone who enjoyed Twilight or Harry Potter. It is fun to compare the characteristics of the "creatures" from one book to another, such as the difference between the vampires in Twilight versus the vampires in The Discovery of Witches. Deborah Harkness did a great job building a mythical world within the human world. She explains the attributes of her witches and vampires very well, while leaving some gray areas in the description of daemons (perhaps to be resolved in the next books).
If you decide to read The Discovery of Witches, be sure to let me know what you thought of the book!
Sunday, September 1, 2013
Banana Ice Cream
I was talking to a friend the other day about healthy eating and she mentioned wanting to try this banana ice cream. The conversation gave me the idea to write about my experience with this recipe on my blog, so here you go!
I have been making this for a few months; ever since I started trying a lot of vegan recipes. This recipe does not have to be vegan, since it can be adapted to fit your tastes, but for people who are vegan or who are trying to stay away from dairy, this is a great ice cream alternative.
I learned how to make banana ice cream from this blog post: http://userealbutter.com/2010/08/12/single-ingredient-ice-cream-recipe/.
When I use bananas to make "ice cream," I usually make a peanut butter, banana ice cream because it is simple and healthy. If you are not a fan of peanut butter, you can make this with or without. Both my 3 year old and 14 month old love it! My 3 year old starts chanting "ice cream, ice cream" whenever I make it for him.
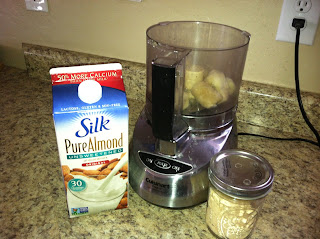 To make this ice cream and get a good, "soft serve" consistency, you need a high quality food processor. Personally, I use the 9 cup Cuisinart food processor. Food processors can be a pain to clean, but I LOVE mine and use it a couple times a week. It opens up so many recipe possibilities! I actually didn't even own a food processor until 7 or 8 months ago, but this recipe is one of the reasons I decided to splurge on one.

You also need some cut up, frozen bananas. I keep a bag of frozen bananas in my freezer, so that I am ready to go whenever I feel the urge to make this. When I have bananas sitting on my counter that are turning a bit too brown to eat (and I don't feel like using them to bake), I peel them, cut them into 1 or 2 inch discs and freeze them on a cookie sheet with parchment paper. Once they are frozen (after about an hour), I transfer them to a freezer, zip lock bag for later use. And don't fret if they turn a little brown after being stored in the freezer for a few weeks, they still work great for this recipe!
To make enough for 4 good sized servings of banana "ice cream," you will want to get your hands on about 3 or 4 bananas worth of banana pieces. Put the frozen banana discs in the food processor. I like to add a splash of almond milk or soy milk to help speed up the process. (You can use cow's milk or omit the milk altogether) Then, pulse the bananas until smooth and there are no more chunks. It will take a few minutes, so be patient and stop every once in a while to scrape the sides of the food processor.

At this point, you could eat it as is! I like to add a tablespoon or two of PB2 for some flavor and protein without adding a lot of calories. This gives the "ice cream" a yummy peanut butter taste while keeping it pretty darn healthy! Haven't heard of PB2? Well, you are missing out if you are a peanut butter lover! I LOVE, LOVE, LOVE peanut butter. But, I don't love all the calories in just two small tablespoons. I came across PB2 on amazon.com. It is powdered peanut butter made with peanuts and a bit of salt and sugar. 90% of the fat is removed. PB2 is great to use in smoothies, recipes, whatever; definitely one of my favorite finds on Amazon this year.
Don't like peanut butter? That's cool too, you can be as creative as you want: cocoa powder, chocolate chips, mint extract, nuts, candy etc. Just add whatever you want to the food processor and pulse a few more times or stir the mix ins by hand.


And, now it is time for me to eat some ice cream! No guilt, but still yummy! Be sure to let me know if you give this a try and share what mix-ins you use!
recipe:
Banana Ice Cream
2 or 3 frozen bananas cut into pieces
a splash of milk
Mix ins of your choice
Pulse bananas in a food processor until smooth and creamy. Scrape the sides as needed. Add in mix ins by hand or by pulsing a few times. Eat and enjoy! You can try freezing whatever you don't eat right away, but I personally do not care for the texture when it is refrozen. So, I usually just make enough to eat right then and there.
I have been making this for a few months; ever since I started trying a lot of vegan recipes. This recipe does not have to be vegan, since it can be adapted to fit your tastes, but for people who are vegan or who are trying to stay away from dairy, this is a great ice cream alternative.
I learned how to make banana ice cream from this blog post: http://userealbutter.com/2010/08/12/single-ingredient-ice-cream-recipe/.
When I use bananas to make "ice cream," I usually make a peanut butter, banana ice cream because it is simple and healthy. If you are not a fan of peanut butter, you can make this with or without. Both my 3 year old and 14 month old love it! My 3 year old starts chanting "ice cream, ice cream" whenever I make it for him.


You also need some cut up, frozen bananas. I keep a bag of frozen bananas in my freezer, so that I am ready to go whenever I feel the urge to make this. When I have bananas sitting on my counter that are turning a bit too brown to eat (and I don't feel like using them to bake), I peel them, cut them into 1 or 2 inch discs and freeze them on a cookie sheet with parchment paper. Once they are frozen (after about an hour), I transfer them to a freezer, zip lock bag for later use. And don't fret if they turn a little brown after being stored in the freezer for a few weeks, they still work great for this recipe!
To make enough for 4 good sized servings of banana "ice cream," you will want to get your hands on about 3 or 4 bananas worth of banana pieces. Put the frozen banana discs in the food processor. I like to add a splash of almond milk or soy milk to help speed up the process. (You can use cow's milk or omit the milk altogether) Then, pulse the bananas until smooth and there are no more chunks. It will take a few minutes, so be patient and stop every once in a while to scrape the sides of the food processor.

At this point, you could eat it as is! I like to add a tablespoon or two of PB2 for some flavor and protein without adding a lot of calories. This gives the "ice cream" a yummy peanut butter taste while keeping it pretty darn healthy! Haven't heard of PB2? Well, you are missing out if you are a peanut butter lover! I LOVE, LOVE, LOVE peanut butter. But, I don't love all the calories in just two small tablespoons. I came across PB2 on amazon.com. It is powdered peanut butter made with peanuts and a bit of salt and sugar. 90% of the fat is removed. PB2 is great to use in smoothies, recipes, whatever; definitely one of my favorite finds on Amazon this year.
Don't like peanut butter? That's cool too, you can be as creative as you want: cocoa powder, chocolate chips, mint extract, nuts, candy etc. Just add whatever you want to the food processor and pulse a few more times or stir the mix ins by hand.

Once your mix ins are stirred in, eat it up before it melts! Here is my little girl enjoying her ice cream! (No, she is not two years old yet and YES, I did give her the peanut butter ice cream. Nut allergies don't run in our family, so I have been slowly introducing it to her.)

And, now it is time for me to eat some ice cream! No guilt, but still yummy! Be sure to let me know if you give this a try and share what mix-ins you use!
recipe:
Banana Ice Cream
2 or 3 frozen bananas cut into pieces
a splash of milk
Mix ins of your choice
Pulse bananas in a food processor until smooth and creamy. Scrape the sides as needed. Add in mix ins by hand or by pulsing a few times. Eat and enjoy! You can try freezing whatever you don't eat right away, but I personally do not care for the texture when it is refrozen. So, I usually just make enough to eat right then and there.
Subscribe to:
Posts (Atom)